Store in a Telegram Bot (Mini-App)
How to create an online store in Telegram. Step-by-step instructions for creating a mini-app in Telegram
Information
Before creating a store, connect a messenger to the chat bot — see Telegram connection
How to Create a Mini-App (MiniApp) in Telegram
1. Activate the store
Go to the bot constructor and open the "Online Store (MiniApp)" section.
.png)
"Online Store (MiniApp)" section
Enable the "Activate store" and "Activate MiniApp launch button" toggles.
.png)
"Activate store" and "Activate MiniApp launch button" toggles
A button to open the store will appear in the chat bot.
Important
The button may appear in the app with a delay on Telegram's side (about 5 minutes).
If the button did not appear in the chat, try switching between chats or restarting the Telegram app.
.png)
Mini-app launch button. May differ for different clients
Information
You can copy the store link to launch the store via a link in the bot scenario.
2. Create a category
Go to the "Categories" section and click "Add Category".
.png)
"Add Category" button
Fill in the "Name" field and upload a category image. Wait for the image to upload, then click "Create".
.png)
Creating a category
Information
To change the display order of categories, specify a sort value. Categories are displayed from highest to lowest sort value. The higher the sort value, the earlier (higher/left) the category is displayed.
3. Create product options
Information
Options let you create product variants, for example, different colors, grades, sizes, weights, etc. Each product variant can have its own price.
.png)
Go to the "Options" section and click "Add Option".
.png)
"Options" section
Fill in the option name and add variants.
.png)
Creating an option
Information
To change the display order of options, specify a sort value. Options are displayed from highest to lowest sort value. The higher the sort value, the earlier (higher/left) the option is displayed.
Click the "Create" button.
4. Add products
Go to the "Products" section and click "Add Product".
.png)
"Add Product" button
On the "Main" tab, fill in the name, category, price, and product description.
Information
A product without a category will be displayed in a separate section. The name for this section can be changed in store settings in the "Other products" field.
.png)
Main product characteristics
Go to the "Images and Video" tab and upload an image. Optionally, you can upload additional images and videos.
.png)
"Images and Video" tab
Go to the "Characteristics" tab and click "Add". Enter the characteristic name and its value.
.png)
Adding a characteristic
Go to the "Options" tab and select the required options (see "Create product options").
.png)
"Options" tab
Click the "Create" button.
Information
You can view the created product card in the "Settings" and "Design" sections. Click the product card to go to the product page.
5. Edit main texts
Go to the "Settings" section.
On the "Main" tab, configure the texts that will be displayed to users. You can keep the default values or edit them.
After changing texts, click the "Save" button.
.png)
Settings. "Main" tab
Information
To see changes, refresh the app page.
Important
Text changes may appear in the app with a delay on Telegram's side (about 5 minutes).
6. Configure delivery and payment methods
Go to the "Settings" section, then open the "Payment and Delivery" tab.
Select the store currency. The price of all products will be displayed in the store in this currency.
Information
If the store currency and payment system currency differ, the order amount will be converted to the payment system currency when paying.
If the payment system supports multiple currencies, supported currencies will be paid without conversion; unsupported ones will be converted to rubles.
.png)
"Payment and Delivery" tab
Payment
Information
If you plan to use online payment, first connect payment systems. Go to the "Settings" section on the "Integrations" tab. For more on connecting payment systems, see payment systems.
.png)
After adding payment systems, return to "Online Store (MiniApp) → Settings" and continue payment configuration.
Select a payment method.
.png)
Selecting a payment method
Important
For mini-apps in store format, 4 payment systems are available: Robokassa, YooKassa, Prodamus, and T-Bank.
Important
Cash payment (on delivery) is only available when pickup delivery is selected.
When store delivery is selected, the payment method is forcibly set to "Online payment".
Delivery
Select a delivery method.
.png)
Selecting a delivery method
If you selected "Store delivery", choose how delivery cost is calculated:
- fixed amount: specify a fixed delivery cost in the input field
- percentage: specify what percentage of the cart total delivery costs
- free
.png)
Selecting delivery cost calculation method
You can set free delivery starting from a specified cart total. To do this, enable the "Free delivery available" toggle and in the input field specify the cart total from which delivery becomes free for users.
.png)
Free delivery starting from a specified cart total
If you selected "Pickup", add pickup point addresses.
Information
Increase the sort order so the pickup point address appears higher in the list.
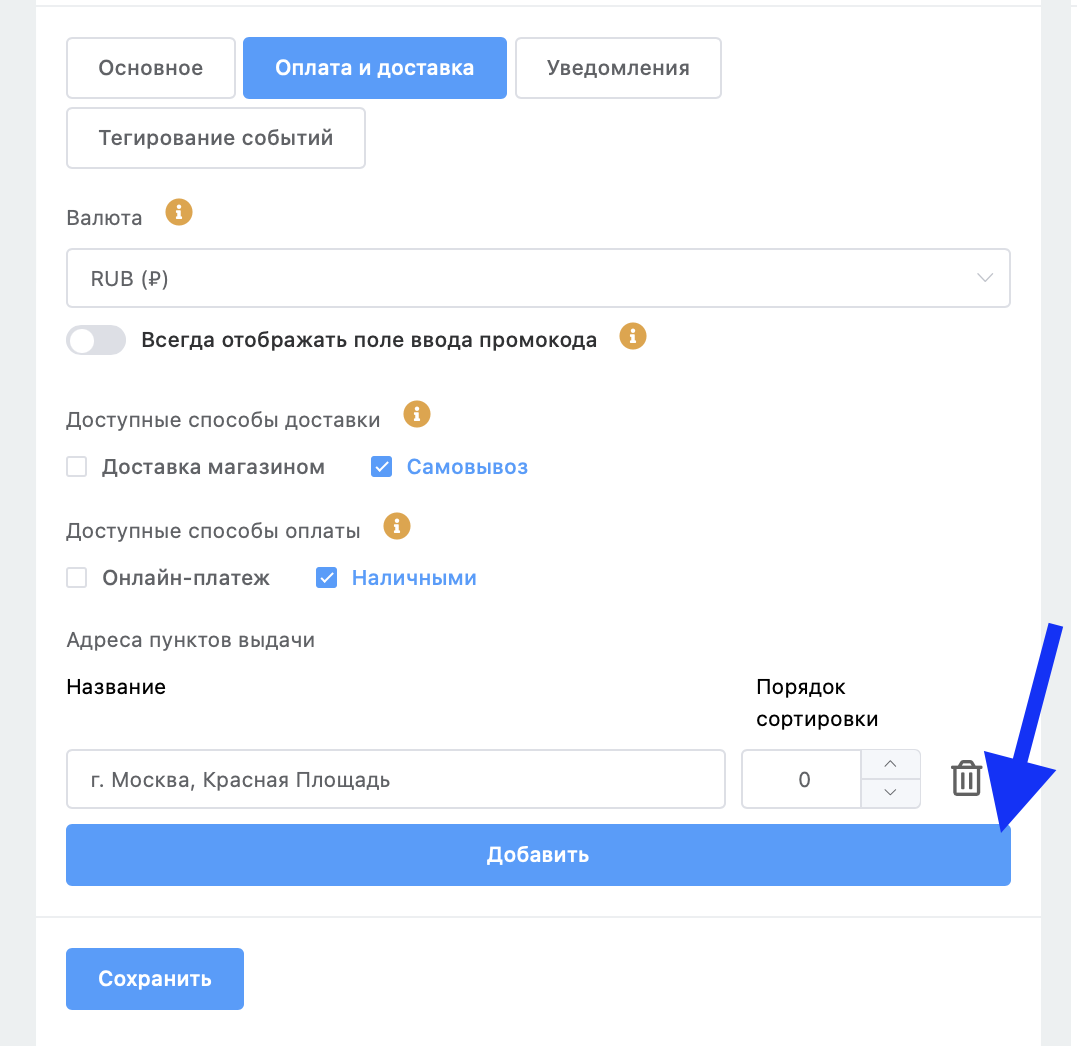
Add pickup point address
Important
After changing delivery and payment settings, don't forget to save changes.
7. Configure tagging
Optionally, you can enable event tagging in the store.
Go to the "Settings" section, then open the "Event Tagging" tab.
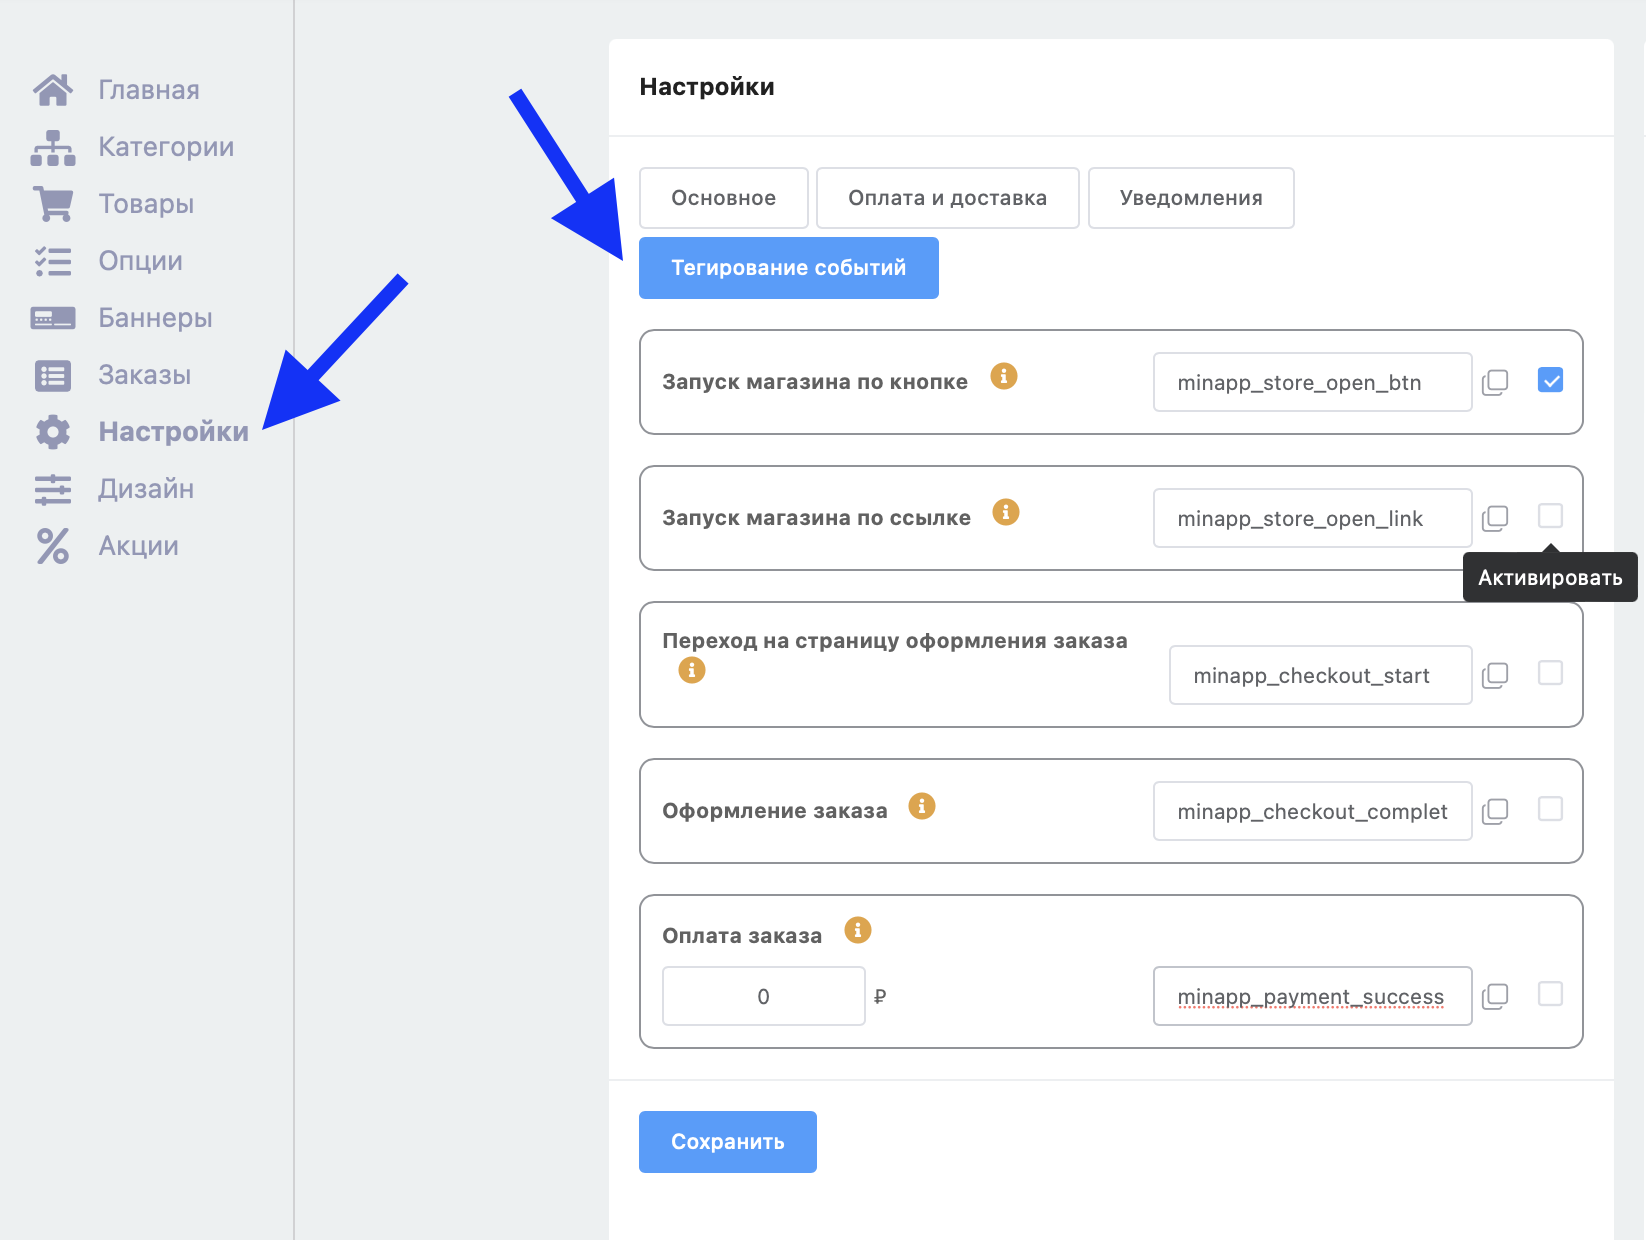
Event tagging
Enable tracking for events that require tagging.
Information
When an event occurs in the store for a contact (for example, the contact places an order), a tag will be added for that contact if tracking is enabled for that event.
Added tags appear in the contact list in the "Tags" field.
You can use these tags in mailings and in the bot scenario.
Important
For stores created before 04/17/2025, for tags to work correctly, you need to turn off and turn on the toggles again in the "Home" section.
.png)
If you use a link in a scenario, it must be updated.
Optionally, you can change the tag text.
Information
When you change a tag, the change only affects new events and does not change tags already assigned to contacts.
To copy tag text, click the Copy button to the right of the tag.
For the "Order payment" event, specify the minimum cart total at which the tag will be assigned. To tag payment for any orders, set the cart total to zero.
Important
The "Store launch via button" and "Store launch via link" events are processed only once per user device.
If the corresponding tags are removed from a contact and that contact launches the store again on the same device, the tag will not be assigned.
8. Upload a banner
Optionally, you can add banners.
Information
A banner is displayed at the top of the store.
Go to the "Banners" section and click "Add Banner".
.png)
"Banners" section
Fill in the "Name" field, upload an image, and select the page the banner should lead to.
.png)
Creating a banner
Information
You can configure on which pages to show the banner, for example, show it only on the home page ("Category list").
9. Configure notifications
Go to the "Settings" section and specify the email where you want to receive order notifications.
.png)
"Notifications" tab in "Settings"
10. Grant administrator access (optional)
You can grant access to other users to work with the store. For more on configuring access permissions, see How to Grant Access to Another User. Permissions and Roles.
Creating a MiniApp Store in Telegram
Bonus for new users: get 500 rubles in bonus points as a gift 🎁
- Register on LEADTEX
- Create and test your first project
- Don't miss the special offer. Get your gift 👈